- On the dashboard, scroll down to the section 'Schemes' or click the Schemes icon at the top,
 find the scheme you wish to edit for example 'Weight Management' click Edit.
Onboarding Guidance - Tip for Super Scheme Admins
Tip: This is usually completed by a Super Scheme Admin and relevant, though not limited to, setting up a new scheme as part of a new customer account.
Edit Scheme information
- Edit contact details from the Scheme page. This will also allow you to overwrite the default scheme provider contact details as seen in the screenshot below.
Contact details of the scheme:
- You are able to amend the description of the scheme and the tasks (please follow the video guide to amend the tasks).
- Optionally, you can select 'Use as default scheme provider contact details' to update all your other schemes to the same contact details.

Coverage area:
- Repeat step 1 above.
- To change the coverage area select postcodes that are now covered or deselect the postcodes that are no longer covered. You will not be able to deselect postcodes that have an active referral.
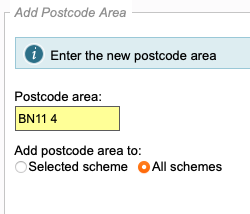
- Add a postcode by clicking on the 'Add a Postcode' button.
- Input the postcode. The default is to add a postcode to All Schemes. If you wish to add a new postcode to a specific scheme only, click Select Schemes
- Click Save Changes to save any changes made.
N.B. Add the whole 'generic' part of the postcode until the final number leaving out the last two letters."
For example: Manchester M1 1 is valid and BN1 1 is valid etc
Edit Questionnaires settings
Preview allows you to view in edit mode or in view/print mode. Preview edit mode allows you to complete the questionnaire as you would when completing in for a client. View/Print mode in Preview allows you to look at the questionnaire.
Edit allows you to amend details about the questionnaire but not the questionnaire itself.
You can change the title, header, footer, the trigger event and days after trigger event that a questionnaire will be available.
To make the questionnaire Active (from Inactive if required) simply tick the Active / Inactive box.
Once you have the changes desired, click Save.


Would you like client questionnaire links to appear in the session register?
Tick the "Show link on session register" and Save.
When in a session register, clicking on the client's questionnaire link takes you straight to the right questionnaire to complete!