Let's start with a glossary of terms used in ReferAll relating to locations (venues), type of activity (activities) and classes (sessions).
Onboarding Guidance - Tip for Super Scheme Admins
Tip: Step 4 is usually completed by a Super Scheme Admin during onboarding. This step is relevant, though not limited to, setting up a new scheme as part of a new customer account.
Definitions
Venues
- The venue is the location that the meeting, assessment, induction, review or an exercise/class will be held in - this could be a gym, leisure centre, church hall etc
Activities
- An Activity can be a meeting, assessment, induction, review or an exercise/class that a person will be booked into.
Sessions
- A Session is the date/time that someone will be taking part in the Activity - this could be a one-off session or a course ie: every Wednesday at 1900 hrs for the next 12 weeks.
Step A: Venues
Start by checking you have all the venues set up that you require for the scheme.
- Go to Activities icon / Manage Venues tab / click Add New Venue (lower right of page).
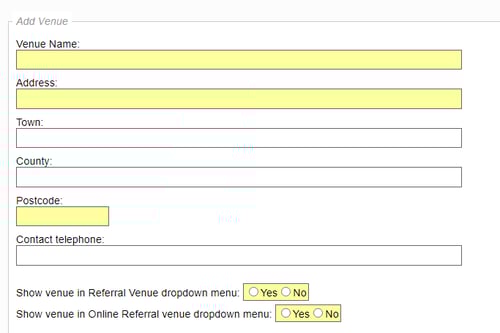
- Complete the fields – those in yellow are mandatory.
- Click SAVE.
If your scheme/s intend to book a referral into a session on the same day & time, when selecting the same venue ReferAll prevents the booking being made. The message displayed includes the session day / date / time:

The configuration behind the scenes in ReferAll avoids the double-booking of a venue.
What you need to do
If the above scenario may apply, we recommend you create multiple venues using a naming convention, for example:
- Council office - room 1 or name of advisor i.e. Jenny
- Council office - room 2 or name of advisor i.e. Peter
In the case of remote sessions, apply the same principle:
- Remote venue 1 or name of advisor / Jenny
- Remote venue 1 or name of advisor / Peter

Show venue in Referral venue dropdown menu
The first option will allow you to see or change the Referral Venue from within the referral record:
Show venue in Online Referral venue dropdown menu
Important note: Prior to 17.07.23. If your Webform is configured to display the Venues section, our support team will be contacting you soon. For those customers, the functionality to "Show venue in Online Referral venue dropdown menu" will only be available once our development team have updated this section to the new-style and make the necessary configuration to your Webform.
Step B: Activities
Before you begin creating your service Activities, it is important to understand ReferAll's Activities & Bookings Solution is not a replacement for your staff scheduling tool but is aimed at working alongside your staff rota.
For example, if you create two different activities and generate two sessions with the same session owner on the same date / time / venue, ReferAll will allow you to book a referral/s into both of the sessions without being warned.
If you run a complex timetable of activities such as the example above, and wish to re-create all available sessions in your ReferAll platform, it is recommended you and your team make bookings from the Calendar (Manage Session Registers) tab for a full-overview of your timetable.
Using existing activities
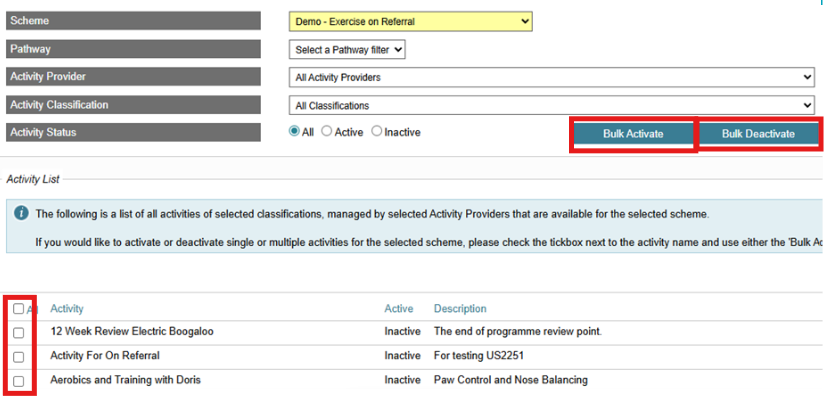
Before adding a new activity, you can check the activities that are already available within your scheme provider by opening the Manage Activities tab and selecting your scheme, then hitting Search. This will show a list of all activities available within your scheme provider account. You can then use the tick boxes on the left to select the activities you want and hit Bulk Activate to activate them for your selected scheme.
Adding new activites
- Create a new activity, using a naming convention one per type i.e. Initial Assessment.
- Go to Manage Activities.
- Select the desired Filter Activities from the dropdown options.
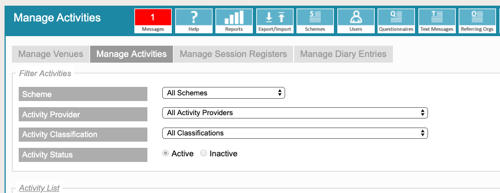
- You can double check the Activity you want is not there by filtering the selections as per the screenshot above.
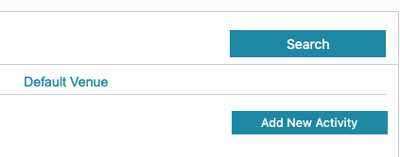
- Once you are sure you need to create one, select the Add New Activity button.
- Click Add New Activity.
- The next screen you see if the "Configure Activity" popup.
- Complete the Activity Definition screen (example below is from the Use a Default configuration choice above)
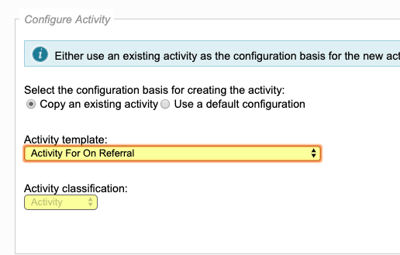
- We suggest that you Use a Default Configuration rather than copy an existing Activity.
Activity Definition:
- Activity title - the name of the activity
- Activity description - what the activity entails
- Activity classification - what the activity is
Activity provider:
- Activity Provider - the provider of the activity
- Edit details - edit provider details
- Add new provider - add details for the new provider
Venue Definition:
- Select the default venue for the Activity.
- We recommended all Venues are added via the Activities icon >Manage Venues tab. Your venues will display in the drop-down list.
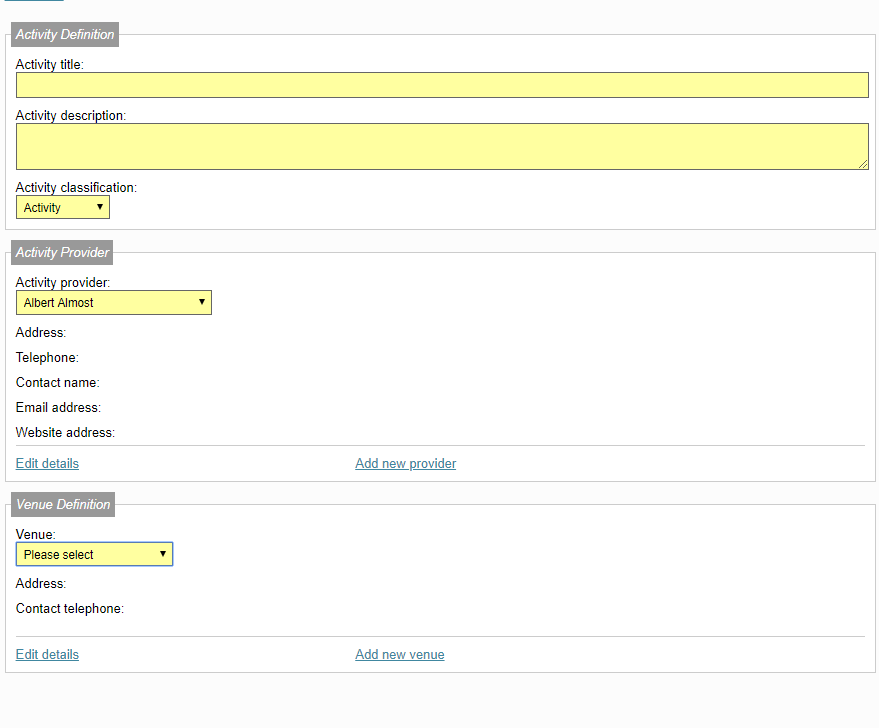
- Fill in the details you require, using any drop down boxes if there are multiple selections.
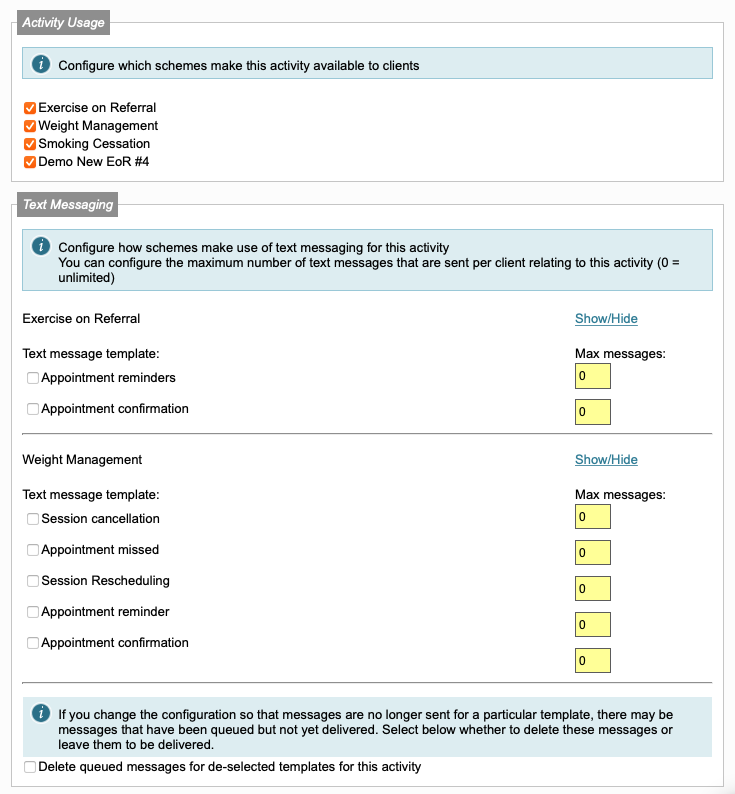
- Over to the right of the page you will see the areas to define which schemes your Activity is to be made available to and the Text Message campaigns that you will be using:
- Which schemes the activity is available for
- Whether text message reminders of sessions are sent
- An important section relates to Activity Configuration Defaults requiring a Pass/Fail Assessment.
Important note: From Referred status, to ensure referrals can be moved to Intends to Participate, and not directly to Participating at least one activity must have the pass or fail box ticked.
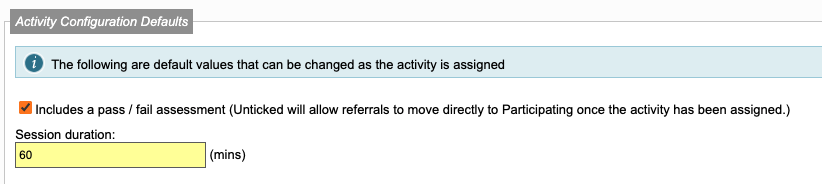 N.B. If an assessment has been marked as passed - for any of the assigned activities - the referral will move directly to Participating status.If you are revisiting this article, and want to know how to resolve this, head over to: Why does a referral skip ITP status?
 - Further down the page you can see other fields that you can add criteria. The default is unticked, here's how they play out if you select any of the following:
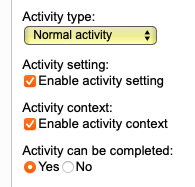
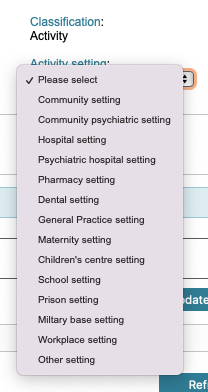
- Activity setting
- Activity context
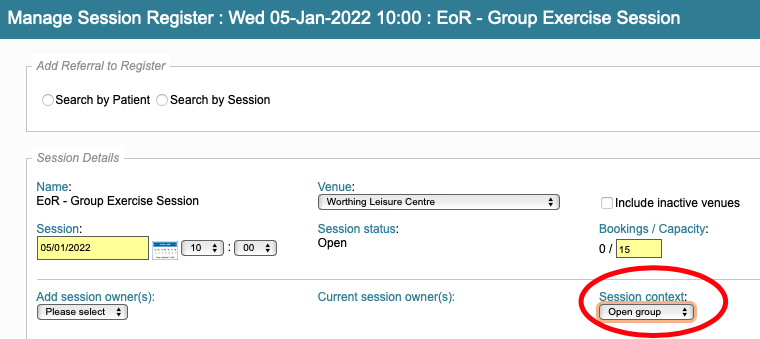
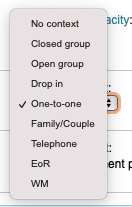
In generated sessions for that Activity, you will see the following drop-down list:
- Activity can be completed
This setting is a way to mark an Assigned Activity in a Referral Record / Manage Activities tab as completed, however it is a notional tick box.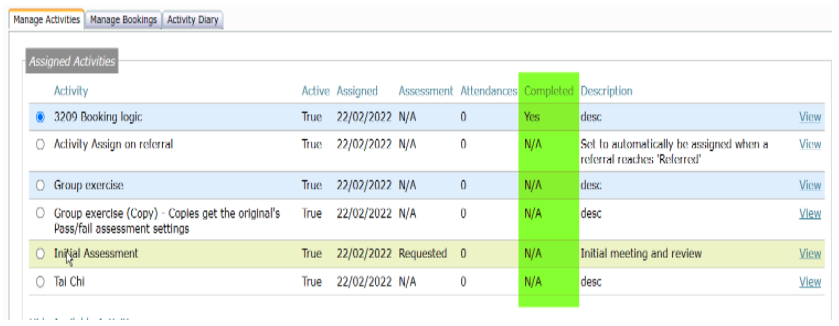
Click View: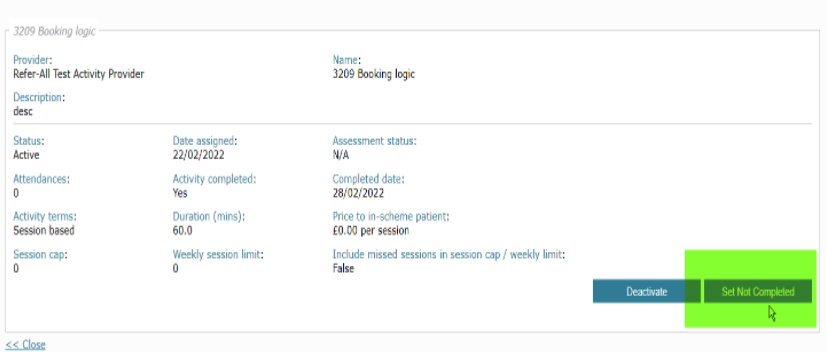
The setting doesn't stop the Activity being booked again.
The field is exportable.
- Auto-finalise activity register:

When ticked, a register will finalise automatically once everyone on the register has been marked as attended or absent.
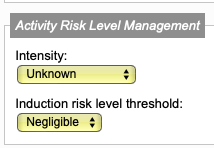
- Activity Risk Level Management enables the Activity to be configured with Intensity and Induction risk level threshold to be set as a default.
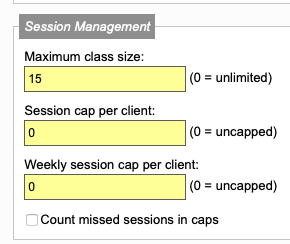
- The final section Session Management relates to the capacity/maximum session size, which you can customise here. Maximum class size can be amended in a single session as well.
-
Once you have chosen all setting that you need please remember to click:

- The Activity can be found by searching the Manage Activities tab.
- Additional features in the Manage Activities tab allow you to either Delete the Activity, Edit the Activity or Create Sessions (see Step 3).

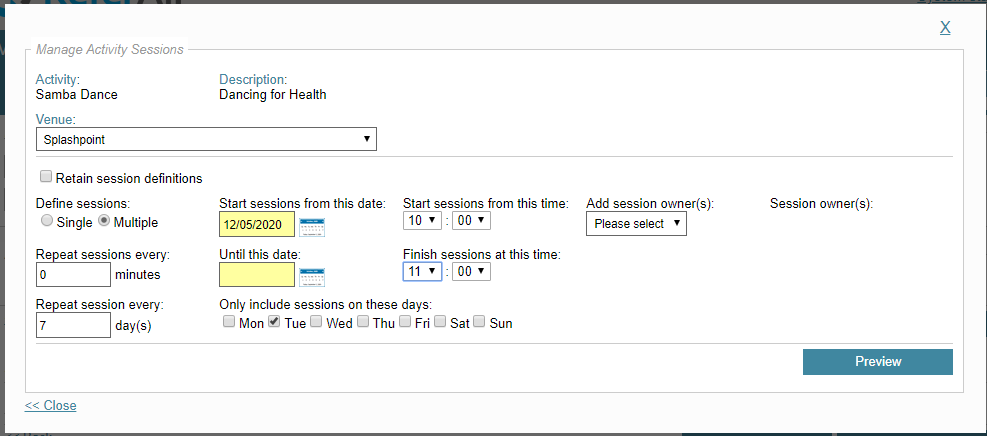
Step C: Create Sessions for your Activity
- Find your Activity in the Manage Activities tab
- Click Sessions
- Click Generate Sessions
- The Manage Activity Sessions screen will show the Activity in its Default Venue (the one you chose when during Activity set-up). Check this is the Venue you want to generate the sessions for.
- If you wish to change the Venue from the default use the Drop down box and select another Venue.**If the Venue you need is NOT there you will need to go back to Step 1: Add a Venue**
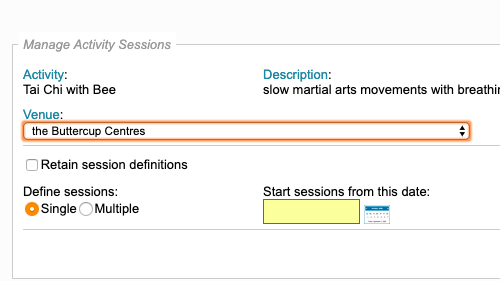
- If you wish to change the session owner (=instructor or advisor) this too can be amended before creating the sessions.
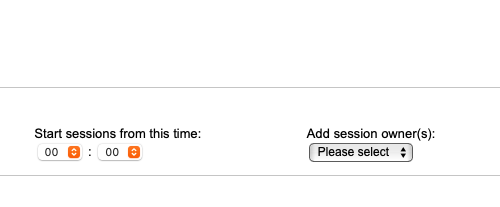
- Click Generate Sessions
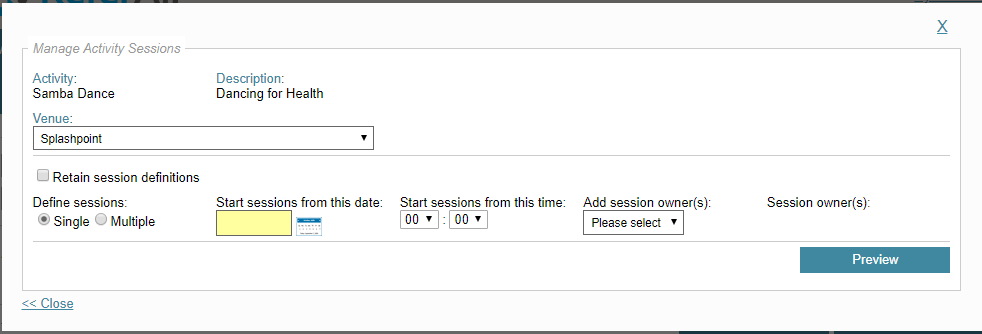
- Choose your Session configuration ie: single session, multiple etc and fill in all the relevant boxes
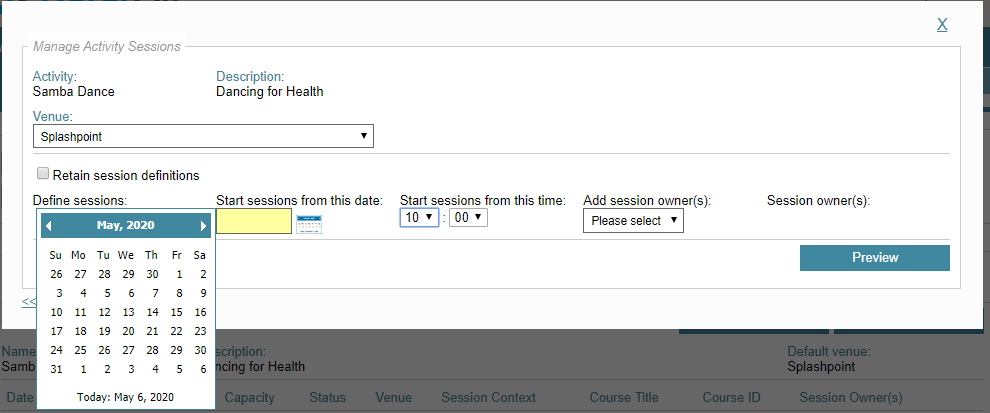
- This will now have created the sessions you wanted – you can Preview this so you are able to double check before you click Generate
- The next screen will show the sessions you have just generated with the configuration you chose

- From here you can Manage the Register if you wish
- Search by patient, or Search by Session and Add to Register
Next time you need to create a series of sessions you repeat the same process from Step C except this time you can associate the sessions with a different venue (if required). What benefits does this offer? Rather than having multiple activities you will have one activity, for example 'Initial assessment' taking place at multiple venues.
- How does this play out in Reporting? Head over to: Analyse Activity Attendance to learn more.
Congratulations, you're doing brilliantly! Head over to the next guide in ReferAll's Get Started Series: